DIY Outdoor Garden Mirrors: 7 Smart Ideas That Make Any Garden Look Twice as Big
Imagine walking out to your backyard one morning, and it feels bigger than the night before. More open. More full of life. You did not knock down a fence. You did not hire a landscaper. You just added one simple DIY garden mirror to the right spot, and the whole space changed overnight.
That is the quiet superpower of outdoor garden mirrors. They bounce light into dark corners. They double the view of your plants and flowers. They trick the eye into seeing depth where there is none. And when you make one yourself, you get all of that for a fraction of what stores charge.
In this article, you will find 7 beginner-friendly DIY outdoor garden mirror ideas. While these mirrors are magic, you can also combine them with other garden decor ideas for beginners to complete your look. You will also learn how to choose the right materials, where to place your mirror for the best effect, how to keep birds safe, and how to make your mirror last for years outdoors rather than a single season.
Good to know before you start: The mirror itself is not the star. The plants, light, and greenery it reflects are what make the magic. Get the placement right first, and everything else falls into place.
Why Outdoor Garden Mirrors Work So Well
A mirror reflects whatever is in front of it. In a garden, that means flowers, leaves, sky, and sunlight. When you place a mirror in the right spot, it doubles all of that. Your flower bed looks fuller. Your patio feels bigger. And if you position it just right, the mirror looks like a window into another part of the garden.
Mirrors are especially useful in small gardens, shady courtyards, and narrow side yards. They bring in light without any wiring. They add visual interest without adding physical stuff. And they give every guest something to stop and look at.
The effect is so strong that some professional garden designers use mirrors as their first design move in tight spaces. You do not need to hire anyone to do the same thing at home.
Glass or Acrylic: Which One Should You Use?
This is one of the first questions beginners ask, and it matters more than most people realize.
Glass mirrors give you the sharpest, clearest reflection. They look great. But they are heavy, they can shatter if they fall, and they need careful sealing before you use them outdoors.
Acrylic mirrors are about 80 percent lighter than glass. They will not shatter into sharp pieces if knocked over, which makes them the safer choice if you have children or pets around. They are also easy to cut and attach to frames at home. The one downside is that very large acrylic sheets can distort the reflection slightly. Choosing a thicker sheet solves most of this.
For most DIY garden mirror projects, acrylic is the smarter choice. It is easier to work with, safer, and widely available at hardware stores.
One rule that applies to both: Never put an untreated indoor mirror outside without weatherproofing it first. Indoor mirrors are not built for rain, frost, or UV exposure. The frame will warp or rot, and black spots will appear across the reflective surface within a season. Always seal and treat any mirror before it goes outdoors.
7 DIY Outdoor Garden Mirror Ideas
1. The Classic Wooden Frame Mirror
This is the most popular DIY garden mirror project for a reason. It looks clean and classic, it fits almost any garden style, and you can build it in an afternoon.
You will need exterior-grade plywood or thick timber, an acrylic or glass mirror, exterior wood paint or sealer, and mirror adhesive or L-brackets.
- Cut your wood into the frame shape you want. Rectangular and arched shapes both work well.
- Sand all edges smooth so there are no rough spots or splinters.
- Apply two coats of exterior wood paint or sealant to all four sides of every piece. Let each coat dry fully.
- Attach the mirror to the frame using mirror adhesive or metal mirror clips.
- Run a bead of outdoor silicone sealant along all edges where the mirror meets the wood. This keeps moisture out.
- Mount the finished frame to your fence or wall using heavy-duty outdoor screws.
Paint the frame the same color as your fence for a neat, blended look, or use a contrasting color to turn the mirror into a bold focal point.
2. The Pallet Wood Mirror
For a rustic, farmhouse look without spending much money, reclaimed pallet wood is hard to beat. The weathered texture and warm tones of pallet timber look right at home in cottage gardens, wildflower spaces, and casual backyard areas.
- Look for clean, heat-treated pallets. They will be stamped with the letters HT. Avoid pallets stamped MB, which means they were treated with methyl bromide, a chemical you do not want in your garden.
- Pull apart the slats and cut them to match your desired frame size.
- Sand the wood and treat it with an exterior stain or wood sealer.
- Arrange the slats around the mirror and attach them using wood glue and nails or screws.
- Attach the mirror using mirror clips or strong outdoor adhesive.
- Seal all back edges with outdoor silicone sealant.
You can leave the pallet wood its natural color for a rustic feel, or paint it white, sage green, or charcoal for a more polished look.
3. The Garden Window Mirror
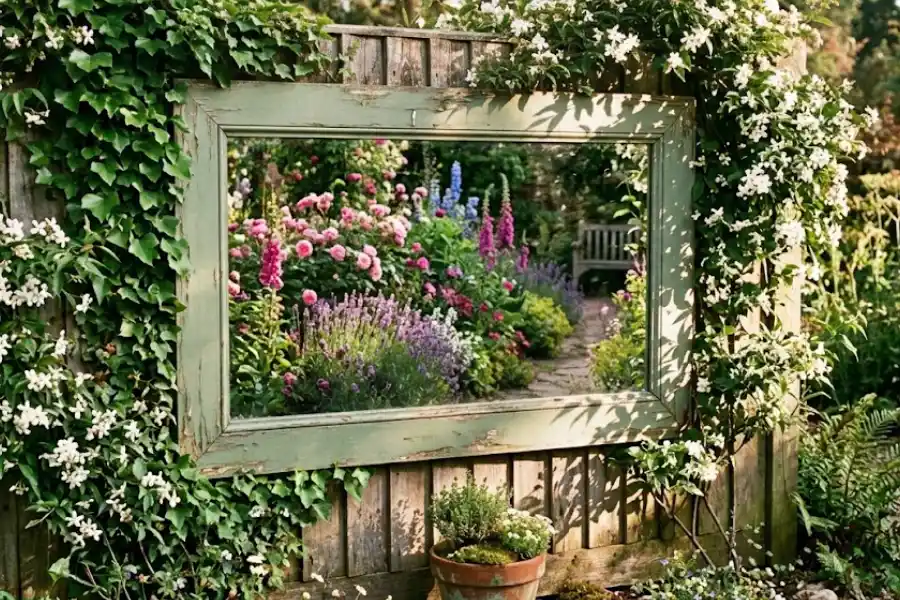
This style is one of the most loved DIY garden mirror ideas online, and it is not hard to understand why. A garden window mirror looks like an old window frame mounted on a fence or wall. The effect is magical: it appears to open onto another part of the garden that is not really there.
You can build a frame from thin strips of wood, divided into panes, with small acrylic mirror tiles glued behind each opening. Or, for the simplest version, paint an old trellis panel and glue mirror tiles to the back of the open sections. Trellis is cheap, easy to find, and already has the grid shape built in.
Once the mirror is in place, train climbing plants like ivy, jasmine, or clematis around the edges. Over time, the plants frame the mirror naturally, making it look like a real window tucked into the greenery. The result looks like something from a magazine, and it can cost less than $25 to make.
4. The Mosaic Mirror
If you want something truly one-of-a-kind, a mosaic garden mirror is the project for you. Use broken tiles, sea glass, pieces of old plates, or colored ceramic pieces to create a bold, artistic frame around a simple mirror.
- Start with a basic round or rectangular acrylic mirror.
- Arrange your mosaic pieces around the border until you are happy with the pattern.
- Glue the pieces down using outdoor-rated tile adhesive. Let it cure fully.
- Apply weather-resistant tile grout between all the pieces.
- Wipe away excess grout before it hardens and allow everything to cure before placing the mirror outdoors.
A mosaic mirror looks stunning in Mediterranean-style gardens, near colorful container plants, or on a bright patio with bold outdoor cushions. Because it uses broken or leftover materials, it is also a great zero-waste project.
5. The Rope Frame Mirror
This is one of the easiest projects on the list. No cutting, no painting, and no complex assembly required. Just wrap thick natural rope or jute rope tightly around the frame of a basic mirror and secure it with a hot glue gun as you go.
Layer the rope so no gaps are visible. You can leave it its natural tan color for a casual coastal look, or spray paint the finished frame white or navy for something more polished.
This style works especially well near outdoor dining areas, on decks and patios, or in gardens with a beachy or nautical theme.
6. The Upcycled Thrift Store Frame Mirror
Thrift stores, yard sales, and estate sales are full of old picture frames, window frames, and ornate mirrors that look tired but have great bones. Pick one up for a dollar or two, give it a fresh coat of exterior paint, and replace any old glass with acrylic mirror sheeting.
Sand the frame first, then prime it with an exterior primer, and finish with two coats of outdoor paint. Rust-inhibiting primer is important for metal frames. Seal all joints with outdoor silicone once you attach the new mirror.
Sage green, terracotta, matte black, and aged white are all popular colors that look great in a garden. A thrift store frame with the right paint job can look more expensive than something brand new.
7. The Trellis Window Mirror (Best for Beginners)
If you are brand new to DIY projects, start here. This version requires almost no tools, no sawing, and no special skills.
Buy a small wooden trellis panel from a garden center. Paint it your chosen color and let it dry. Glue mirror tiles to the back of the trellis openings using strong outdoor adhesive. Prop it against a fence or shed, or secure it lightly to the fence with garden wire.
Over time, you can let climbing plants grow around it to help it blend into the garden. The total cost is usually under $20. The result looks like you spent much more.
Where to Place Your DIY Garden Mirror
The best mirror in the world will not do much if it is hung in the wrong spot. Placement is the most important decision you will make with this project.
- Face it inward, not outward. Mount your mirror on a fence or wall so it reflects the garden back toward you. This creates the illusion of more space and depth. A mirror facing the street does nothing for your garden experience.
- Think about what it will reflect. Walk to the spot where the mirror will go and look in the direction it will face. Is there something beautiful to reflect? You want the mirror to show off your flowers, plants, or a water feature. You do not want it to reflect a blank fence, a bin, or a garden hose.
- Keep it at eye level. This is one of the most common beginner mistakes. Mirrors hung too high lose their impact. At eye level, the reflection creates a convincing illusion of depth and space. Much higher than that, and the effect disappears.
- Choose a spot with indirect light. Avoid placing mirrors where they will catch direct afternoon sun. More on why in the safety section below.
- Surround it with plants. The single most effective styling trick is to half-hide the mirror with climbing plants, shrubs, or hanging baskets. This makes the mirror look like a real window nestled in the garden. It is a simple step that makes a huge difference.
Safety Tips You Cannot Ignore
Garden mirrors are safe when placed thoughtfully. But there are a few real risks that you need to understand before you install one.
Bird Safety
Birds can mistake a garden mirror for open space and fly directly into it. This risk is highest in spring during breeding season. Male birds sometimes see their own reflection and attack it, thinking it is a rival. This can lead to injury.
To reduce the risk, avoid placing mirrors in wide open areas where birds fly frequently. Position them lower to the ground, tucked among plants where birds are less likely to fly at full speed. You can also add a few small stickers or decals to the mirror surface to break up the reflection, without ruining the look.
If you notice birds repeatedly approaching the mirror, move it to a different location.
Fire Hazard: The Truth
You may have heard that garden mirrors can cause fires. Here is what matters: flat mirrors do not concentrate sunlight enough to start a fire. Only concave mirrors, the kind that curve inward, can focus light into a burning point. A standard flat garden mirror is not a fire risk in that way.
However, a flat mirror in direct sunlight can create strong, uncomfortable glare. It can also heat up surfaces nearby. Keep mirrors in areas that get dappled shade or indirect light. Test the position at different times of day before fixing it permanently.
Children and Pets
Always choose acrylic over glass if young children or active pets spend time in the garden. Acrylic does not shatter into sharp pieces. And always make sure the mirror is properly secured. A large mirror knocked over by a child or a dog can cause a serious injury if it is glass.
Wind and Secure Mounting
Gardens experience much more wind than indoor spaces. Use heavy-duty outdoor screws and wall anchors to mount any garden mirror securely. Never just lean a large mirror against a fence and walk away. A strong gust can bring it down without warning.
How to Weatherproof Your DIY Garden Mirror
This step is what separates a mirror that lasts one season from one that still looks great five years later.
- Seal the back edges first. Moisture creeping behind the reflective coating is what destroys outdoor mirrors. It causes black spots that spread over time. Before you mount the mirror, run a bead of outdoor silicone sealant around all four edges. This is the most important weatherproofing step.
- Treat all sides of the wooden frame. Paint or sealant on the front is not enough. The back, sides, and cut ends of any wood frame need protection too. Apply exterior wood paint, stain, or sealant to all surfaces before assembly.
- Check metal frames for rust each spring. Metal frames can rust at the joints where the coating chips. Sand any rust spots back to clean metal and touch them up with rust-inhibiting paint.
- Re-seal the edges every year. Outdoor silicone sealant breaks down over time from UV exposure and temperature changes. A fresh bead applied each fall, before the wet season begins, will extend the life of your mirror significantly.
- Bring it inside during harsh winters if needed. In areas with heavy snow and hard frost, lighter DIY frames may not survive extended exposure. Bringing the mirror indoors from December to March can add years to its life.
Common Mistakes That Beginners Make
- Putting the mirror in direct sunlight. Strong glare is uncomfortable and can cause problems for both people and birds. Keep mirrors in indirect light.
- Hanging it too high. Eye level is the sweet spot. Higher than that and the depth illusion does not work the way it should.
- Skipping the weatherproofing. One afternoon spent sealing and treating your mirror properly can mean the difference between one season and five years of use.
- Not sealing the back of the mirror. The front looks fine for months while moisture quietly destroys the reflective coating from behind. Seal the back before installation.
- Reflecting something boring. Always ask yourself: is what this mirror reflects worth seeing twice? If the answer is no, move the mirror until the answer is yes.
Frequently Asked Questions
Can I use a regular indoor mirror in my garden?
Yes, but you need to weatherproof it first. Treat the frame with exterior paint or sealant and seal all mirror edges with outdoor silicone before putting it outside. Even with treatment, an indoor mirror may not last as long outdoors as one designed for exterior use. Acrylic mirror sheeting is a better long-term choice for a DIY project.
Are outdoor garden mirrors safe for birds?
With careful placement, yes. Avoid putting mirrors in open flight paths, especially during spring when birds are territorial. Position mirrors low and among plants rather than high on open walls. If birds repeatedly fly at your mirror, move it to a different spot.
Do garden mirrors cause fires?
Flat mirrors do not concentrate light enough to start fires. Only concave mirrors, those that curve inward, pose that risk. However, flat mirrors in direct sun do create glare and can heat nearby surfaces, so keeping them in indirect light is still a smart choice.
How do I clean an outdoor garden mirror?
Use a soft cloth and a mild, non-abrasive cleaner. Avoid harsh chemical sprays that can strip the sealant or damage the frame. Clean gently rather than scrubbing. Morning or evening is the best time to clean, so the surface is not hot from the sun and streaks are less likely to form.
How long will a DIY outdoor garden mirror last?
A well-made and properly sealed garden mirror can last five to ten years or more. The frame is usually what breaks down first. Regular maintenance, including annual re-sealing and refreshing the frame finish, will extend the life of your mirror considerably.
Which DIY garden mirror is easiest for a total beginner?
The trellis window mirror is the best starting point. It needs no cutting, no special tools, and costs very little to make. Once you are comfortable with that, you can try the pallet wood frame or classic wooden frame for a more polished result.