Painted Garden Rocks: 12 Easy Ideas That Last Outdoors
Picture this. You paint a cute ladybug rock on Saturday. A month later, the rain has washed half of it away.
That is the biggest problem with painted garden rocks. The painting part is easy and fun. Making the colors last outside is where most people get stuck.
This article fixes that. By the end, you will know which rocks to pick, which paint to buy, and how to seal your painted garden rocks so they can handle sun, rain, and cold. You will also get 12 simple ideas you can copy today, even if you have not touched a paintbrush since grade school.
How this article was put together: it pulls together advice from garden educators, craft brands, and hobby painters. It also covers the mistakes beginners make most often. Where experts disagree, this article says so.
Why Gardeners Love Painted Garden Rocks
Plants need water, sun, and care. Rocks do not. Painted garden rocks add color all year long, even in the weeks when your flowers are not blooming.
People enjoy them for a few simple reasons:
- They are cheap. You can often start with rocks from your own yard.
- They are easy. You do not need art skills. Dots, stripes, and simple shapes look great.
- They are useful. You can turn them into plant markers or border pieces.
- They are personal. You can make them match your style, your family, or a memory.
- They are kid friendly. Painting rocks is a great afternoon activity for children.
What You Need to Make Painted Garden Rocks
Grab these supplies before you start. In most US craft stores, a basic set of paint, brushes, and sealer costs about $20 to $30.
- Smooth rocks in different sizes
- Dish soap, water, and an old toothbrush
- White acrylic paint or gesso for the base coat
- Outdoor or multi-surface acrylic paint in your favorite colors
- A flat brush and a thin detail brush
- Paint pens for small details and words
- Clear spray sealer made for outdoor use
- Newspaper, a paper plate for mixing paint, and disposable gloves
How to Pick the Best Rocks
The rock you pick changes how your finished piece looks. Here is what to look for.
- Smooth surface. River rocks are a favorite because they are smooth and easy to paint.
- A flat side. A flat top gives you more room for your design.
- Solid, not crumbly. Rocks that flake will take your paint with them.
- The right size. Palm size works well for flowers and bugs. Long, thin rocks work well for plant markers.
Rocks are porous, which means they soak up water. That is why washing and drying them well matters so much. You can buy bags of smooth river rocks at garden centers and home improvement stores. Larger batches also work well for river rock landscaping around beds and paths.
One more thing. Many parks, beaches, and nature areas do not allow people to take rocks home. Check the local rules first, or buy your rocks instead.
Best Paint for Painted Garden Rocks
Acrylic paint is the top choice for painted garden rocks. It goes on smooth, dries fast, and sticks well. Look for a label that says outdoor or multi-surface. You can read more about the craft in this painted garden rocks article from Gardening Know How.
Here is a quick way to think about your options:
- Outdoor or multi-surface acrylic: The best all-around pick for beginners.
- Patio paint: Made for outdoor use, so it is tough. It can smell strong, so work in a space with fresh air.
- Paint pens: Great for faces, dots, and lettering.
- Spray paint: Good for a solid color. Always seal it afterward.
Skip washable kids paint and watercolors for outdoor rocks. They are made to wash off, so the first rainstorm will take them.
How to Make Painted Garden Rocks Step by Step
Follow these steps in order. Do not skip the early ones. Good prep is what makes the paint stay put.
- Wash the rocks. Scrub them with soapy water and an old toothbrush. Rinse well.
- Dry them fully. Let them sit in the sun until no damp spots are left. Painting a wet rock is a fast way to get peeling paint.
- Add a base coat. Paint the rock white, or use gesso. This makes bright colors pop, especially on dark stones.
- Sketch lightly. Use a pencil to mark where your design goes.
- Paint the big shapes first. Start with the main color, like the red on a ladybug.
- Let each layer dry. Wait until the paint feels dry before adding the next color.
- Add the small details. Use a thin brush or paint pen for dots, eyes, and words.
- Dry for a full day. Give the paint time to set before sealing.
- Seal every side. The next section shows you how.
How to Seal Painted Garden Rocks So They Last
This is the step that decides whether your rocks last one month or many seasons. Many tutorials rush through it, so let us slow down.
Here is the key fact. Regular Mod Podge is water soluble in most formulas, so it is not a good outdoor sealer on its own. If you like Mod Podge, use the Outdoor or Dishwasher Safe formula, and add a clear spray sealer on top. One hobby painter explains this in her post about painting rock supplies.
Craft makers also share their own sealer tests in this post on painting rocks for outdoors. Their results show that opinions vary, so test your sealer before you coat a whole batch.
Follow these tips for a sealer that works:
- Choose a clear acrylic or polyurethane spray labeled for outdoor use.
- Apply two to three thin coats. Wait about 30 to 60 minutes between coats.
- Coat every side, including the bottom.
- Spray outside on a calm day, and wear gloves.
- Test the sealer on the back of one rock first. Some sealers can turn colors yellow or stay sticky.
Pro tip: Thin coats beat one thick coat. A heavy spray can drip, bubble, or stay tacky for days.
12 Painted Garden Rocks Ideas You Can Copy Today
1. Ladybug Rocks
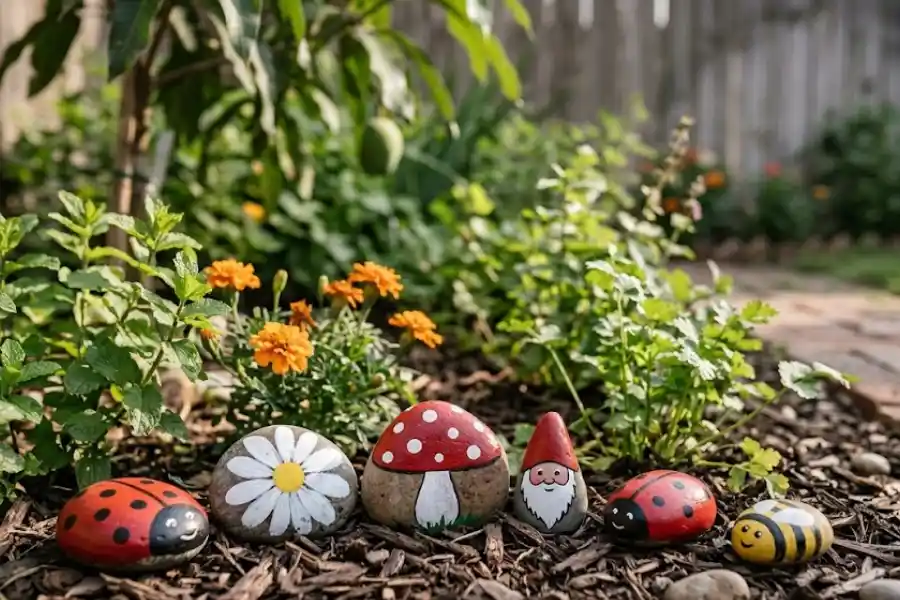
Paint a round rock red, add a black line down the middle, and dot the wings. Ladybugs are a symbol of luck, so tuck them near your plants.
2. Plant Marker Rocks
Write the name of each herb or vegetable on a flat rock. Use a longer rock for plants with long names, like cilantro or zucchini. A black paint pen keeps the letters sharp. Rock markers also work well next to other garden plant markers like stakes and tags.
3. Flower Rocks
Daisies and zinnias are easy because they use simple petal shapes. Place them in bare spots or around a potted plant.
4. Garden Gnome Rocks
Paint a pointed red hat, a white beard, and a round nose. Gnomes bring a playful touch to a flower bed.
5. Mushroom Rocks
Pick a rock with a rounded top for the cap and a thin rock for the stem. Add white spots on a red cap. They look sweet in shady corners and fairy gardens, where they fit right in with other fairy garden accessories.
6. Bee and Butterfly Rocks
Yellow and black stripes make a quick bee. Butterflies work well with bright wings. Kids love making these.
7. Pet Rocks With Faces
Give each rock a silly face. They are perfect for a kids craft day, and each one turns out different.
8. Word Rocks
Paint one short word like grow, bloom, or peace. Set them along a path or by your front door.
9. Memory Rocks
Paint a name, a date, or a favorite color to honor someone you love. A quiet corner of the garden is a good home for it. Some families also choose a garden stone for memorial use when they want something more permanent than paint.
10. Dot Pattern Rocks
Dip the back of a paintbrush in paint and press it onto the rock. Repeat in rings. The result looks fancy but takes very little skill.
11. Color Fade Border
Paint a row of rocks that slowly shift from one color to the next, like yellow to orange to red. Line them along a bed or walkway.
12. Rock Flower Bed
Paint a group of rock flowers, then set them on a bed of pebbles, mulch, or soil. It gives you a flower patch that needs no watering.
Where to Place Painted Garden Rocks
Where you put your rocks matters as much as how you paint them. Try these ideas.
- Group them in threes or fives. Odd numbers often look more natural.
- Use shady spots. Bright rocks add life where flowers do not grow well.
- Match or contrast. Pick colors that match your flowers, or choose a bold color that stands out.
- Keep them out of the mower path. A spinning blade and a rock are a bad mix.
- Use them in pots. A painted rock on top of the soil adds a finished look.
Mistakes That Make Painted Garden Rocks Fade or Peel
Most problems come from a short list of errors. Avoid these and your rocks will last much longer.
- Skipping the wash. Dust and dirt keep paint from sticking.
- Painting on damp rocks. Trapped water lifts the paint later.
- Using indoor or washable paint. It will not survive rain.
- Skipping the sealer. Unsealed paint fades and flakes faster.
- Using one thick coat of sealer. It can drip or stay sticky.
- Sealing too soon. Wet paint under sealer can smear or cloud.
How to Care for Painted Garden Rocks
A little care goes a long way. Check your rocks once in spring and once in fall.
- Wipe them gently with a damp cloth. Do not scrub hard.
- Touch up any worn spots with matching paint, then add a fresh coat of sealer.
- Many crafters add a new coat of sealer once a year.
- If your winters bring hard freezes, store your rocks indoors. Freezing and thawing can crack the paint.
Safety Tips Before You Start
- Use sealers outside. Work in fresh air, wear gloves, and follow the label.
- Let everything dry. Keep kids and pets away from wet sealer.
- Let adults handle spray products. Kids can paint, and an adult can do the sealing.
- Protect your veggie bed. Paint chips do not belong in soil where you grow food. Place painted rocks next to edible plants, not mixed into the planting soil.
- Check the rules for collecting. Do not take rocks from places where it is not allowed.
Frequently Asked Questions
What is the best paint for painted garden rocks?
Outdoor or multi-surface acrylic paint is the best pick for most people. Add paint pens for fine details.
Do painted garden rocks need sealer?
Almost always, yes. A few outdoor paints claim to need no sealer, but a clear coat gives extra protection against rain and sun.
How long do painted garden rocks last?
It depends on your weather, paint, and sealer. With good prep and a yearly recoat, many painted garden rocks stay colorful for several seasons.
Can I leave painted rocks outside in winter?
In mild climates, yes. In areas with hard freezes, bring them inside to protect the paint.
What if I make a mistake?
Wipe it off with a damp cloth while the paint is still wet. If it has dried, let it dry fully and paint over it.
Are painted rocks safe for kids to make?
Yes, with the right setup. Use paint labeled non-toxic, and let an adult handle any spray sealer.
Final Thoughts
Painted garden rocks are one of the easiest ways to add color, humor, and charm to your yard. The secret is simple. Wash the rock, use outdoor paint, and seal it with thin coats.
Start small. Pick one idea from the list and paint three rocks this weekend. Place them in your garden and see how they hold up. Then add a few more.
Your garden will look brighter, and you will have made something that is truly yours.