Arched Garden Trellis: Sizing, Placement & Best Plants
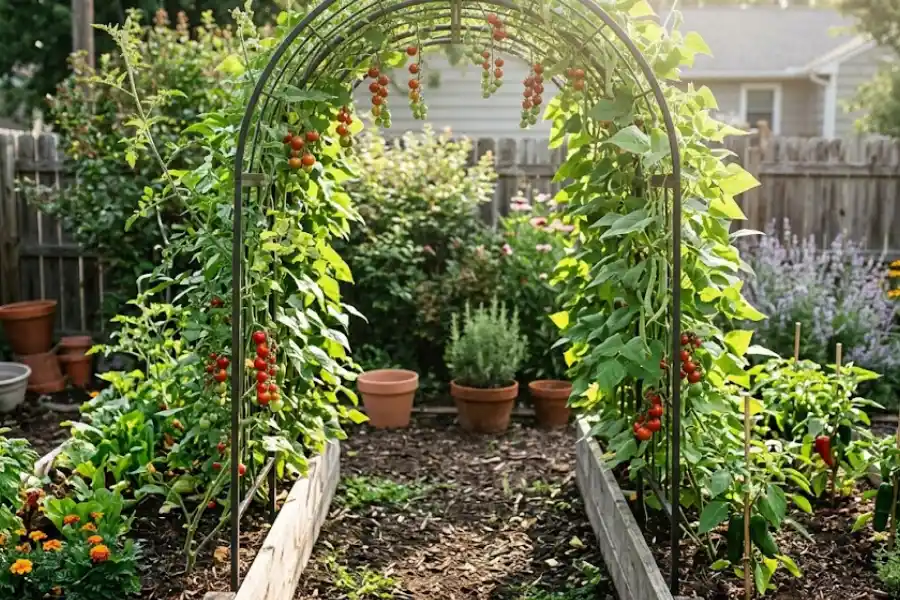
Picture this. You walk outside on a quiet morning and a full, green arch stands right in the middle of your garden. Cherry tomatoes hang down like little red ornaments. Pole beans twist up the sides. A few climbing roses peek over the top. The whole thing smells incredible and looks like it belongs on the cover of a gardening magazine.
That is what a good arched garden trellis can do. And the best part is that it does more than look good. It helps your plants grow better, saves space in your yard, and makes picking your harvest a whole lot easier.
This article walks you through everything. What an arched trellis is, which material to choose, how to pick the right size, where to put it, what to plant on it, how to install it, and what mistakes to avoid. By the time you finish reading, you will be ready to go get one.
What Is an Arched Garden Trellis?
An arched garden trellis is a curved frame that climbing plants grow up and over. Think of it like a doorway for your garden. Plants climb up one side, meet at the top, and either hang down on the other side or create a lush, green tunnel effect.
It is different from a flat panel trellis, which usually leans against a wall or fence. It is also different from an obelisk, which is a tower shape that sits in one spot inside a bed.An arch creates a gateway shape. That makes it the most dramatic and functional garden addition most home gardeners ever put in their yard, much like an Arbor for Garden Gate creates a welcoming entrance to an outdoor space.
Why an Arched Trellis Beats Other Trellis Types
A lot of gardeners start with a simple flat panel and then wish they had just gone with an arch. The arch comes out ahead in most situations for a few good reasons.
- You can walk under it. A tall enough arch turns your garden into something you step through, not only look at from the outside. That changes the whole feel of your outdoor space.
- It doubles your growing space. Plants go up both sides of the arch and hang fruit down the middle. You get more food from the same patch of ground.
- Harvesting becomes much easier. When fruit hangs down from above, it is simple to spot and simple to pick. You do not have to dig through tangled vines on the ground looking for hidden cucumbers.
- It gives your garden a focal point. An arched trellis acts as a centerpiece. Everything else in the garden feels organized around it.
- It connects two raised beds. If you have two raised beds with a walking path between them, an arch trellis can turn that path into a working tunnel garden.
Types of Arched Garden Trellises by Material
Arched trellises come in three main materials. Each has its own strengths. A simple breakdown below helps you choose the right one for your garden.
Metal (Powder-Coated Steel)
This is the best all-around choice for most gardeners. Powder-coated steel is strong enough to hold heavy plants like tomatoes and cucumbers without bending or wobbling. It stands up through rain, wind, and summer heat season after season. The coating protects it from rust, and a good metal trellis can realistically last for decades without much fuss. If you ask experienced gardeners what they use, metal is almost always the answer.
Wood (Cedar or Redwood)
Wood trellises have a warm, natural look that blends right into a traditional garden. Cedar and redwood resist rot and insects better than other types of wood, making them the smarter picks if you go this route. The downside is that even the best wood needs some upkeep. You will likely need to re-seal or re-stain it every few seasons to keep it from breaking down over time.
Vinyl and Plastic
Vinyl trellises are the lowest maintenance option on the list. They do not rot, rust, or need painting. Many designs look like wood or metal at a lower price point. The weakness is strength. Heavy vines and strong winds can stress lighter plastic designs more than expected. If you choose vinyl, go with a heavy-duty version and make sure to anchor it well.
How to Choose the Right Size
Size matters more than most first-time buyers realize. A trellis that is too short will get outgrown fast. A base that is too narrow will feel tight and crowded. Look at these things before you buy or build.
Height
Aim for a trellis that is at least 6 feet tall at its highest point. Seven feet is even better. This gives most vining plants room to grow without running out of space and leaves enough clearance for you to walk underneath without ducking. If you are taller than 6 feet, look for something in the 7 to 8 foot range so you do not bang your head every time you walk through.
Width
Most arched trellises are between 60 and 80 inches wide at the base. That is about 5 to 7 feet. You need enough width to walk through comfortably and to leave room for plants growing up each side. If you are placing the arch between two raised beds, measure the walking path between them first. Then pick an arch whose base fits inside your beds on each side of the path.
A Simple Sizing Rule Worth Remembering
If you are not sure where to start, use this rule: the width of your arch should be about two-thirds of its height. So if the arch is 6 feet wide, aim for about 9 feet tall. If the height is 6 feet, go with a base of around 4 feet wide. This ratio looks visually balanced and handles the weight of growing plants well.
Where to Place Your Arched Garden Trellis
Placement is one of the most skipped steps and one of the most important ones. Get it wrong and your plants may not get enough sun. Get it right and your trellis becomes the best thing in your yard.
The East-to-West Orientation Rule
This is one of the most important tips most guides skip entirely. When you set up your arch, point the long sides toward the east and west. That way, plants grow up both sides of the arch and get good sunlight all day long. If you orient it north to south instead, the plants on the north side will sit in shade for much of the day and grow much more slowly than the plants on the south side. Many beginners make this mistake and then wonder why one side of their trellis is bare.
Between Two Raised Beds
This is the most popular setup and for good reason. An arch that spans the path between two raised beds creates a tunnel effect, ties the whole garden together, and makes your space feel like a private little retreat. Your raised beds should be at least 3 feet wide for this to work well. That gives you room to plant climbing crops along the inside edge of the arch on both sides without crowding out everything else in the bed.
Directly in the Ground
You do not need raised beds to use an arched trellis. You can anchor one directly in the ground along a garden row. This works great for a long row of pole beans, cucumbers, or any other climbing crop. Drive the legs or stakes at least 6 inches deep, and go deeper if your soil is soft or if your area gets a lot of wind.
The Best Plants for an Arched Garden Trellis
The right plants will take over your arch quickly and create something that looks amazing and feeds you all season. The wrong plants will just sit there and disappoint. Here are the best picks by category.
Vegetables
- Cherry tomatoes are one of the most popular choices for a reason. They climb well, produce in large amounts, and fruit hangs down perfectly for easy picking all season long.
- Cucumbers are natural climbers and love going vertical. They are much easier to find and harvest when hanging down from above rather than sprawling on the ground.
- Pole beans grow fast and add great texture to the sides of an arch. They are also one of the easiest crops a beginner can grow.
- Luffa gourds and small melons can work on a strong metal arch. However, heavier fruit will need extra support like small mesh bags tied to the frame to keep it from pulling vines down.
Flowers
- Climbing roses are stunning on an arch and create a classic garden look. Make sure your trellis is strong enough since roses become heavy once established. A powder-coated steel arch handles this well.
- Clematis comes in dozens of colors and climbs quickly with little help. It blooms for a long time and is one of the best choices for a first-time arch gardener.
- Morning glory grows fast and works great for beginners who want quick, colorful results in their first season.
- Passion vine creates a dramatic tropical look and brings in butterflies and hummingbirds as a bonus.
What to Avoid
Skip wisteria unless you have a very heavy-duty metal arch and you are ready for regular, aggressive pruning. Wisteria is beautiful but grows fast and heavy enough to damage a lighter trellis within a single season. Also skip giant pumpkins and full-size watermelons. The weight is simply too much for most arch designs to hold safely.
Buy It or Build It? A Straightforward Comparison
This is one of the most common questions people ask, and the real answer depends on your budget, your skill level, and how long you want your trellis to last.
Buying a Premade Arched Trellis
A quality premade metal trellis costs anywhere from $80 to $300 or more depending on size and brand. It comes with all the parts, looks clean and professional right away, and is built to last for years or even decades. You do not need tools or building skills. Most designs go together in under an hour. This is the right choice if you want something permanent that you plant around once and enjoy for a long time.
Building a DIY Arched Trellis
A basic DIY arch using a cattle panel and two T-posts costs around $30 to $35 in materials and takes about an afternoon to put together. You will need a helper since bending a cattle panel into an arch is a two-person job. This is a great entry-level option for gardeners who want to try an arch without a big upfront cost.
One important note: cattle panels can collapse under the weight of very heavy crops mid-season. If you plan to grow something like large tomatoes or heavy squash, invest in a commercial steel arch instead. The extra money is worth it when you are not watching your whole trellis fall over in July.
How to Install an Arched Garden Trellis: Step by Step
The steps vary slightly depending on whether you are putting your arch in raised beds or directly in the ground.
Installing in Raised Beds
- Set the trellis legs inside the raised bed on each side of the walking path between your beds.
- Press the legs or stakes firmly into the soil. Aim for at least 4 to 6 inches of depth inside the bed.
- For beds that are at least 12 inches deep, the packed soil should hold the arch securely. For shallower beds, use ground stakes that go through the bed and into the earth below.
- Check that the arch is centered and standing straight before the soil fully settles around it.
- Plant your climbing crops at the base of each leg along the inside edge of the bed.
Installing in the Ground
- Mark the placement of each leg with a small flag or stick before you start.
- Drive the stakes or legs at least 6 to 8 inches into the ground. In soft or sandy soil, go 10 to 12 inches for extra stability.
- Check that the arch is level and standing straight before packing soil around the base.
- Tamp the soil firmly around each leg to remove any air pockets.
- Plant your climbers 2 to 4 inches inside the arch legs so roots do not crowd the anchor points.
Pro Tip: Set up your arched trellis two to three weeks before you plant. This lets the soil settle around the base and gives you time to test how sturdy the arch really is before your plants are depending on it for support.
5 Common Mistakes to Avoid
Most trellis problems come down to just a few errors. Avoid these and you will save yourself a lot of frustration.
- Installing too late. Putting up your arch after plants are already growing risks damaging roots and stems. Set up the trellis first, then plant around it.
- Wrong sun orientation. Pointing the trellis north to south shades one side all day. Always aim east to west so both sides of the arch get full sun.
- Picking a trellis that is too short. A 4-foot trellis may look big in the store but feels cramped once vines start taking off. Stay at 6 to 7 feet minimum.
- Not anchoring deeply enough. A loose trellis will lean and eventually fall over once plants start adding weight. When in doubt, go deeper.
- Choosing the wrong plants. Giant, heavy crops can overwhelm a lightweight arch. Match your plant selection to the strength of your specific trellis material.
Caring for Your Arched Garden Trellis Through the Seasons
A little care goes a long way and keeps your arch working and looking good year after year.
During the Growing Season
Gently guide young vines toward the trellis as they start growing. Use soft garden ties or clips. Never wrap metal wire directly around a stem since it can cut through as the plant grows. After heavy rain or high winds, check the anchor points and press the legs deeper if the arch feels wobbly.
At the End of the Season
Remove dead and dried plants as soon as the season wraps up. Dry plant material is much harder to pull off later and puts extra stress on the trellis frame over winter. Wipe down metal trellises with a dry cloth and check for rust spots. A light coat of rust-inhibiting spray takes care of any problem areas before they get worse.
Through Winter
Metal trellises handle most winters just fine left in the ground. Wood trellises should be treated or sealed before cold weather arrives. If you live somewhere that gets heavy, wet snow, remove the trellis or cover it so that accumulated snow weight does not bend or buckle the frame.
Frequently Asked Questions
How tall should an arched garden trellis be?
At least 6 feet tall. Seven feet is better if you want to walk under it comfortably without ducking. Most vining vegetables also need at least 6 feet of climbing space to reach their full growing potential during the season.
Can I use an arched trellis without raised beds?
Yes, absolutely. An arched trellis can be anchored directly in the ground along any garden row. Just drive the stakes at least 6 to 8 inches deep, and go deeper if your soil is loose or your area gets strong winds.
What is the best material for an arched garden trellis?
Powder-coated steel is the best overall choice for most gardeners. It is strong, rust-resistant, and built to last for decades with very little maintenance. Wood looks beautiful but needs seasonal upkeep. Vinyl is easy to care for but is not always strong enough for heavy crops.
How wide should an arched garden trellis be?
Most arches are between 60 and 80 inches wide at the base. A good starting point is to make the width about two-thirds of the total height. If you are placing the arch between two raised beds, measure your walking path first and pick an arch that fits your specific setup.
Can an arched trellis support climbing roses?
Yes, but only with a strong metal arch. Powder-coated steel handles the weight of established climbing roses well. Avoid thin plastic or lightweight vinyl designs for roses since they become very heavy once they are fully grown in.
How far apart should raised beds be for an arched garden trellis?
A path of 3 to 5 feet between beds works well with most standard arches. Your beds should also be at least 3 feet wide so climbing plants have enough room to grow at the base of each leg without crowding out your other crops.
When is the best time to install an arched garden trellis?
Install it before you plant, ideally two to three weeks ahead of time. This gives the soil time to settle around the anchor points and lets you check that the arch is stable before your plants are counting on it for support.
Your Garden Is Ready for This
An arched garden trellis is one of those additions that changes how your entire garden looks and feels once it is in place. It makes your space look intentional and beautiful. It grows more food in less room. And it turns your garden into a place you want to spend time in.
You do not need a big yard or a big budget. Start with the right size and material for your space. Point it east to west. Plant the right climbers at the base. And set it up before your seeds go in the ground.
That is all it takes. Add one this season and see the difference for yourself.