Garden Plant Markers That Last: Best Types, Pens and Tips
Picture this. It is late spring, and you walk out to thin your carrots. But you find three rows of feathery green tops that all look the same. Which row is which? The wooden stick you wrote on last month is now a blank gray splinter.
This happens to almost every gardener. The fix is simple: good garden plant markers. But not all markers are equal. Some fade in a few weeks. Some snap in the first frost. Some get chewed up by slugs.
In this post, you will find out which garden plant markers hold up outdoors, which pens really stay readable, and what to write on each tag. You will also see the most common mistakes, so you can skip them.
The Short Answer: Which Garden Plant Markers Are Best?
Here is the fast version.
- For seedlings and trays: Cheap plastic or wooden tags, written on with a soft pencil or an oil-based paint marker.
- For vegetable rows and beds: T-shaped plastic tags or tall metal stakes with a paint pen.
- For perennials, shrubs, and trees: Stainless steel, zinc, or copper markers, with the name painted on or pressed into the metal.
- For the pen: An oil-based paint marker. Regular water-based markers fade.
Want the details? Keep reading.
Why Garden Plant Markers Matter More Than You Think
A small label does a big job. Here is what it does for you.
- It stops mix-ups. Many young plants look alike. Parsley, for example, belongs to the carrot family, so the two can be hard to tell apart as seedlings.
- It saves your records. When you know the variety and the date, you can repeat your wins next year.
- It protects sleeping plants. Perennials die back in winter. A marker keeps you from digging them up by mistake in spring.
- It helps other people. A family member or house sitter can water or pick the right plant without guessing.
Garden plant markers also make crop rotation easier. This is the habit of moving crops to a new spot each year to keep the soil healthy and cut down on pests. You cannot rotate what you cannot name.
The Main Types of Garden Plant Markers
There is no single best pick among garden plant markers. The right choice depends on how long you need the label to last.
Plastic Markers: Cheap and Easy
Plastic tags are the most common choice. They cost little, come in big packs, and take ink well. T-shaped tags are easy to push into soil and easy to read.
The downside is that strong sun can make plastic brittle over time. The good news is that you can reuse it. One garden writer at Hartley Botanic suggests scrubbing old plastic labels in hot, soapy water. You can even use both sides.
Wooden Markers: Natural but Short-Lived
Wooden sticks and craft sticks look nice and blend into the bed. They work well for seed trays and for a single season. Wood soaks up water, though, and ink can turn gray.
Here is a smart trick. Use a soft pencil, like a number 2. The graphite sinks into the wood and does not fade in the sun the way ink does, according to this labeling article.
Metal Markers: Best for Long-Term Use
If you want to label once and forget it, look at metal. There are four main kinds.
- Stainless steel: Strong and rust-proof. One gardener at Empress of Dirt recommends 10-gauge stainless steel stakes, sold in heights such as 10, 15, and 20 inches.
- Zinc: Many zinc markers have an etched surface that is easy to write on, and they are built to be reused season after season.
- Copper: It slowly turns blue-green with age, which looks lovely. It suits woody plants and display beds best, because small copper tags can get lost in a busy vegetable bed.
- Aluminum: This metal is soft enough that you can press the plant name into it with a pen tip.
Metal even works in hot places. A gardener in Arizona reports that black metal labels with a paint pen last about four years and can be repainted each season.
Rocks, Slate, and Homemade Ideas
You do not need to spend money. Flat rocks, slate pieces, old spoons, clothespins, and even yogurt cups cut into strips can all work. Rocks and slate have one big bonus: they tend to stay put. If you like the look but not the painting, personalized garden stones can carry a plant name too.
If you like crafts, this is a fun weekend project for kids too. The Micro Gardener shares 20 creative ideas to get you started.
Why the Pen Matters as Much as Your Garden Plant Markers
A great marker is useless if the writing vanishes. Here is a test worth knowing about. One gardener left several pens on tags outside for over six months. The tags faced sun, rain, sleet, and snow. The oil-based paint marker was the clear winner. It did not fade or smear, while the water-based pens did both. You can read the full pen test here.
Plastic surfaces differ, so your results may vary. Test one tag before you label your whole garden.
- Use an oil-based paint marker on plastic and metal.
- Use a soft pencil on wood.
- Press the name into soft metal, like aluminum or copper, for a mark that cannot fade.
- Skip paper labels outdoors. Slugs and snails will happily eat both the paper and the ink.
Quick tip: If you must use a regular marker, plan to rewrite the tag often. One gardener notes that standard marker ink can fade within a few weeks of full sun.
What to Write on Your Garden Plant Markers
Keep it short. A tag crowded with words is hard to read. Here is what to include, in order of importance.
- Plant name: Use the name you will recognize at a glance.
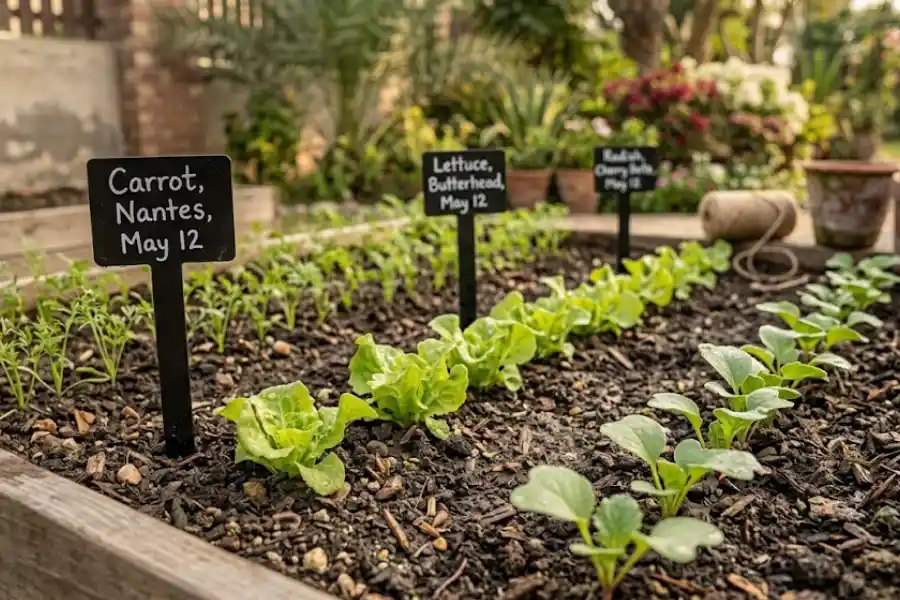
- Variety: Tomatoes come in hundreds of kinds. The word “Roma” tells you far more than the word “tomato.”
- Date: Write the day you sowed or planted. For perennials, the year is enough.
- Source (optional): Add the seed brand or nursery, so you know where to buy again.
- Extra notes (optional): Spacing, planting depth, or a simple sun or water symbol can be handy on larger tags.
A good example looks like this: Tomato, Roma, planted May 12. That is all you need.
How to Choose Garden Plant Markers for Your Space
Different parts of your garden need different labels. Use this list as a quick reference.
- Seedling trays: Small plastic or wooden tags that fit between plants. You only need room for a name and a date.
- Vegetable beds: T-shaped tags or tall stakes that you can read from the path. Decorative garden stakes work too if you want a little style.
- Perennial borders: Metal markers that survive winter. The plant may be invisible for months, so the label must last.
- Trees and shrubs: Metal tags on a loose loop or a stake. Check them each year so nothing squeezes the stem as it grows.
- Containers and herbs: Write right on the pot with a permanent pen, or push in a small stake. If you are still choosing containers, herb garden pots outdoors with smooth sides make labeling easy.
How to Place Garden Plant Markers the Smart Way
Where you put a label is almost as important as what it says. Follow these steps.
- Label right away. Add the marker the moment you sow or transplant. If you wait, you may forget which seed went where.
- Use the same spot every time. For example, always put the tag in the front right corner of the pot or row. Your eyes will learn where to look.
- Face the path. Turn the writing toward where you usually stand.
- Pick a friendly height. Choose a height you can read without bending over.
- Push it in firmly. Wind, pets, and rain can knock over loose stakes. With established plants, push the marker in gently so you do not hurt surface roots.
- Check monthly. Fix any tag that leans, fades, or goes missing.
Five Mistakes That Ruin Garden Plant Markers
- Trusting a regular marker in the sun. It looks fine on day one and fades fast.
- Relying on memory. You will forget by mid-summer. Everyone does.
- Buying tags that are too small. If you cannot read it from two steps away, it is too small. For a whole bed, a larger garden sign may work better.
- Tying tags tightly to stems. Plants grow. A tight tag can pinch or choke a branch.
- Forgetting to update. When you swap one crop for another, change the label. An old tag that tells the wrong story is worse than no tag.
Add a Simple Backup: A Garden Map and Notebook
Even the best garden plant markers can get moved by birds, mowers, or curious kids. A backup takes only a few minutes.
Start with a rough sketch of your garden. Number each bed. Then keep a notebook that lists what you planted in each numbered bed, plus the date. One gardener at Morning Chores also records pests, harvest times, and how each plant performed. That way, next year’s plan is easy.
Another easy idea is to keep your empty seed packets in a small box. If a label fades or goes missing, the packet can help you figure out what you sowed. You can also snap a quick photo of each bed on your phone.
Frequently Asked Questions
What are the most durable garden plant markers?
Metal markers usually last the longest, especially stainless steel and zinc. Pair them with an oil-based paint marker, or press the name into the metal so it cannot wash away.
What can I use if I do not want to buy garden plant markers?
Try flat rocks, slate, old spoons, craft sticks, clothespins, or strips cut from plastic containers. Write on them with a paint pen or a soft pencil.
Which pen does not fade on plant tags?
An oil-based paint marker held up best in a six-month outdoor test. On wood, a soft graphite pencil is also a strong choice.
What should I do if a label fades?
Rewrite it right away, before you lose the information. On plastic, you can write over the old words or flip the tag and use the other side. Old seed packets can help you double-check.
Do I need to label plants I already know?
Yes. Plants change as they grow, and you might forget the variety by next season. Labels also help friends, family, and visitors who share your garden.
Final Thoughts
Good garden plant markers are cheap insurance. They save time, protect your records, and make your garden easier for everyone to enjoy.
Keep it simple. Pick a material that fits your plants. Use an oil-based paint marker or a soft pencil. Write the name, the variety, and the date. Then add a quick map as a backup. Do that, and the next time you walk out to thin your carrots, you will know which row is which.