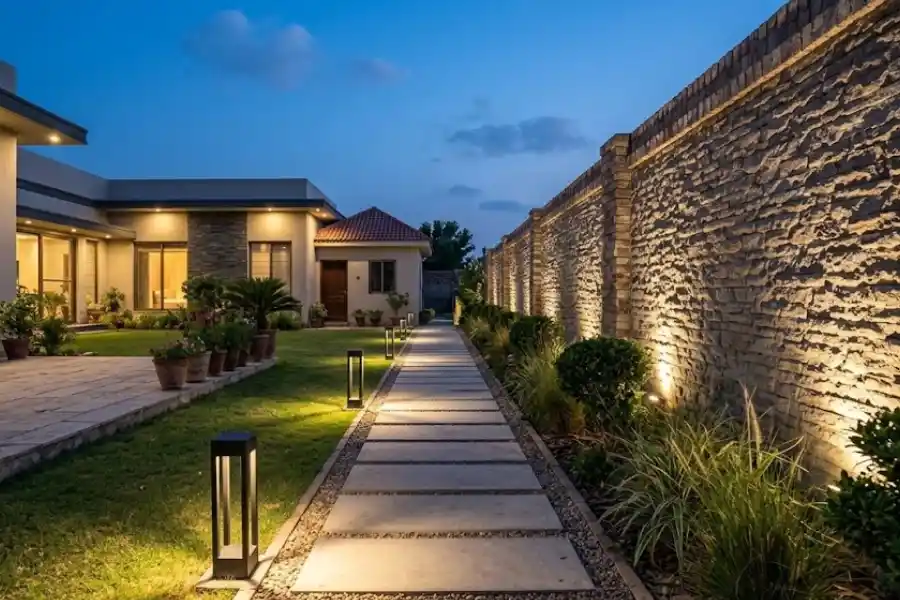
Architectural Lighting for Modern Garden Paths and Walls: 9 Ideas
Your garden looks great at noon. Then the sun goes down, and it vanishes into a dark blob. Sound familiar?
The fix is not more light. The fix is better light. The right architectural lighting for modern garden paths and walls turns a plain yard into a calm, sharp, magazine-worthy space. It also keeps your family safe on the way to the door.
Here is a step by step plan. By the end, you will know which fixtures to pick, where to place them, and which mistakes to skip. No design degree needed.
What Is Architectural Lighting in a Garden?
Architectural lighting means using light to show off the shapes already in your space. Think clean lines, smooth walls, steps, and edges.
Old-style garden lighting often looks like a row of little lamps stuck in the lawn. Modern architectural lighting is different. The fixtures stay small and hidden. You notice the glow, not the lamp.
For paths, the goal is a safe, gentle way to see where you are walking. For walls, the goal is texture and depth. Together they make your garden feel planned.
Why This Style Works So Well for Modern Gardens
Modern gardens are simple on purpose. They use straight paths, flat walls, and a few strong plants. That simple look needs equally simple lighting.
Here is what good lighting does for you:
- Safety: You can see steps, edges, and uneven ground.
- Beauty: Walls and plants get shadows and depth.
- Value: A well-lit yard looks cared for and complete.
- More use: You can enjoy your garden after dark, too.
Start With a Simple Plan Before You Buy Anything
Most people buy lights first and think later. That is how you end up with bright spots and dark gaps. Take ten minutes to plan instead.
- Walk your garden at dusk with a phone flashlight.
- Mark where you walk most, such as the front door, gate, and patio.
- Pick two or three things to show off, like a long wall, a tree, or a water feature.
- Note where you can hide wires and where your power source is.
- Sketch a rough map on paper. It does not need to be pretty.
This small step saves money. It also keeps you from adding too many lights.
Lighting Garden Paths the Modern Way
A modern path should feel like it is outlined with light, not covered in it. Here are the best options.
1. Low Bollard Lights
Bollards are short posts, usually about 12 to 24 inches tall. In a modern style, they have a square or round shape with a slim cut in the side. They throw light down and out in a soft pool.
They work best along wide paths and driveways. Pick a matte black or brushed metal finish for a clean look.
2. Recessed In-Ground Lights
These sit flush with the ground or the path edge. You see the glow, but not the fixture. They are great for stone, concrete, and gravel paths.
Choose a model made for outdoor burial and heavy foot traffic. Check that it has a high water rating, such as IP67.
3. Step and Riser Lights
Steps are where most garden falls happen. Small lights set into the side of a step or under its edge show each level clearly. The light stays low, so there is no glare in your eyes.
4. Linear LED Strips Under Edges
A thin LED strip hidden under a path edge, bench, or low wall makes a clean line of light. It gives that sharp, modern look people love. Use strips sold for outdoor use, with a waterproof cover. A slim metal border, such as corten steel garden edging, is a handy place to tuck one.
5. Tree-Mounted Downlights
Place a light high in a tree and aim it down. The light spreads over the path like soft moonlight, the same idea behind a moonlight garden. It also makes pretty leaf shadows on the ground. This works well on long garden walks.
Lighting Garden Walls Like a Pro
Walls are the biggest canvas in your yard. The way you light them changes the mood completely. These are the three main styles.
6. Wall Grazing
Grazing means placing a light very close to the wall and aiming it straight up or down. The light skims across the surface. Every bump in brick, stone, or textured render pops out in sharp detail.
Set the fixture about 4 to 8 inches from the wall. Any closer and you may see harsh hot spots. Grazing looks best on rough surfaces. On a perfectly smooth wall, it shows every flaw.
7. Wall Washing
Washing is the opposite. You place lights farther from the wall, often 2 to 3 feet, and spread soft light across the whole surface. The wall glows evenly.
This is great for smooth white or gray walls. It also makes a pretty backdrop for plants, because their shadows fall on the surface.
8. Up and Down Wall Lights
These fixtures mount right on the wall. They send light both up and down in two clean cones. They are a favorite on modern patios, boundary walls, and entrances.
Look for models with a shield or narrow beam. That keeps the light on the wall and out of your neighbor’s window.
9. Backlit Walls and Screens
Place a light behind a slatted fence, a floating panel, or a privacy screen. The light leaks out around the edges and gives a soft halo. It is one of the easiest ways to add drama without any glare.
Choose the Right Light Color
Color temperature is measured in Kelvin (K). It tells you if light looks warm or cool.
- 2700K: Very warm and cozy. Great for seating areas and plants.
- 3000K: Warm white. The best all-round pick for most gardens.
- 4000K and above: Cool and bright. It can look harsh in a garden, so use it only where you need strong visibility.
Stick to one color across your whole garden. Mixing warm and cool lights makes a space look messy. If you want to change the mood often, try smart lights that let you adjust the color and brightness from your phone.
How Bright Should Garden Lights Be?
This is where many people go wrong. They pick lights that are far too bright. Garden lighting should be soft, because your eyes adjust to the dark.
As a rough rule, path lights often work well at 50 to 200 lumens each. Wall lights can be a bit stronger, but use a dimmer if you can. When in doubt, go lower. You can always add more later.
Power and Wiring Made Simple
Most modern garden systems use low voltage, usually 12 volts. This is safer than normal house power and easier to install. A transformer plugs into an outdoor socket and lowers the power for your lights.
Here are the key things to know:
- Transformer size: Add up the watts of all your lights. Keep the total under about 80 percent of the transformer’s rating. This leaves room to grow.
- Voltage drop: On long wire runs, lights at the far end can look dim. Use thicker cable, such as 12 gauge, for long distances. You can also split the run into two shorter ones.
- Timers and sensors: A photocell turns lights on at dusk. A timer turns them off late at night. Both save energy.
- Zones: Put paths, walls, and patio lights on separate circuits. Then you can use only what you need.
If your plan needs mains power or a new outdoor socket, hire a licensed electrician. Local rules differ, so always follow your area’s electrical code.
Weather Ratings: What IP65 and IP67 Mean
IP ratings tell you how well a light handles dust and water. For outdoor use, here is a quick summary.
- IP65: Protected from rain and water jets. Good for wall lights and posts.
- IP67: Can handle short dips in water. Good for in-ground lights that may sit in puddles.
Cheap lights often skip this detail. Check the box before you buy. A fixture that fails after one wet winter costs more in the end.
Materials That Last
The finish matters as much as the light. Outdoor fixtures face rain, sun, and sometimes salty air.
- Solid brass and copper: Very long lasting. They age to a soft natural color.
- Stainless steel: Strong and clean looking. Pick marine grade if you live near the sea.
- Powder-coated aluminum: Light and affordable. Good value if the coating is thick.
Avoid cheap plastic for long-term use. The sun makes it crack and fade over time.
6 Common Mistakes to Avoid
- Too many lights. A garden with lights every few feet looks like an airport runway. Space path lights farther apart, often 6 to 8 feet, and let dark areas exist.
- Glare. If you can see the bulb from the house, the fixture is aimed or shielded wrong.
- Mixing colors. Stay with one color temperature.
- Ignoring the wires. Bury cables or hide them along edges. Messy wires ruin the clean look.
- Skipping a test run. Lay out the lights on the ground and look at them at night before you dig. Move them around until it feels right.
- Forgetting the neighbors and wildlife. Bright light that spills over the fence is rude. It also confuses birds, bats, and insects. Use shielded fixtures, warm colors, and a late-night timer.
What Does It Cost?
Prices vary a lot by brand and size, so treat these as rough ranges only.
- Budget setups: Simple low-voltage kits with a few path lights can start at under a hundred dollars.
- Mid-range setups: Better metal fixtures, a stronger transformer, and a smart controller often land in the several hundred dollar range.
- Pro-installed designs: Full custom systems with hidden fixtures and zones can cost much more, but they last for many years.
A smart move is to start small. Light your main path and one feature wall first. Then add more over time as your budget grows.
Easy Care Tips
- Wipe the lenses a few times a year. Dirt and spider webs dull the light.
- Trim plants that grow in front of fixtures.
- Check connections each spring.
- Clear leaves from in-ground lights so water can drain.
Ten minutes of care keeps the whole system looking sharp.
Frequently Asked Questions
How far apart should I place path lights?
A good starting point is 6 to 8 feet apart. On curves and near steps, place them a little closer. The goal is overlapping pools of soft light, not a straight line of bright dots.
Is solar lighting good enough for modern garden paths?
Solar garden lights are easy to install and need no wires. But they are often dimmer and less steady, especially in shade or winter. For a clean, reliable, architectural look, low-voltage LED is usually the better choice.
Should I use warm or cool light on garden walls?
Warm light, around 2700K to 3000K, suits most gardens. It makes stone, wood, and plants look rich. Cool light can work on very modern white walls, but it can feel cold.
Can I install garden lighting myself?
Yes, low-voltage systems are DIY friendly. You plug in a transformer, lay the cable, and connect the lights. Anything that involves mains wiring should be done by a licensed electrician.
How long do LED garden lights last?
Many quality LED fixtures are rated for tens of thousands of hours. That can mean ten years or more of normal use. The housing and seals often wear out before the LED does, so buy well-built products.
Will garden lights raise my electric bill?
Not by much. LEDs use very little power. A full garden system often costs less to run than a single old-style bulb left on all night. A timer helps even more.
Final Thoughts
Great architectural lighting for modern garden paths and walls is about restraint. Use fewer lights, softer color, and smart placement. Let the light draw the shape of your garden instead of filling every corner.
Start with a simple plan. Light your main path for safety. Add one wall for beauty. Keep the color warm and the glare low. Then step outside after dark and enjoy what you built.
Your garden does not have to disappear at sunset. With the right light, it can look even better.