Hosta Seeds Perennial Shade Plant for Garden: How to Grow
Do you have a dark, dull corner in your yard? Hostas can turn it into a lush green space. The cheapest way to get a lot of them is to start from hosta seeds.
But there is a catch that most seed packs skip. Your seedlings will not look like the fancy plant in the photo. Each one will be brand new. Some will be plain. A few may surprise you.
This article shows you how to grow hosta seeds the right way, one step at a time. It also covers what to expect, how long it takes, and how to avoid the mistakes that kill most seedlings.
Can You Grow Hostas From Seed? The Quick Answer
Yes, you can. Hosta seeds sprout well when they are fresh, warm, and damp. Most will sprout within a few weeks. But a seedling needs about three to five years to reach full size. And most seedlings will not match their parent plant.
If you want an exact copy of a named hosta, buy a plant or divide one you already own. If you want a low cost, fun way to fill a shady spot, hosta seeds are a great choice.
What Are Hosta Seeds?
Hostas are a perennial shade plant. That means they die back in fall and return every spring. People grow them mostly for their big, bold leaves.
In summer, hostas send up tall stalks with bell-shaped flowers. The flowers can be white, lavender, or purple. Bees visit them, and that is how the flowers get pollinated. After the bloom fades, a seed pod forms.
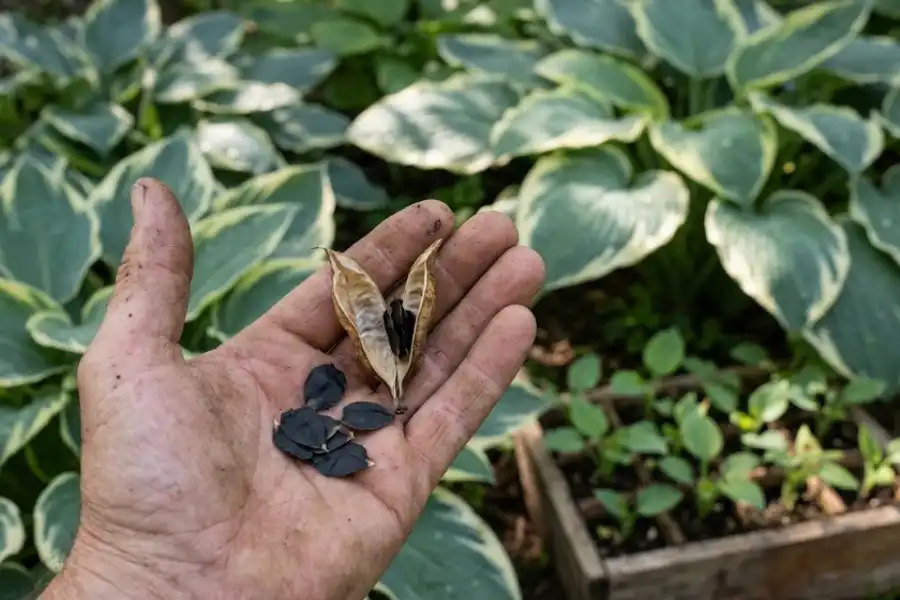
Hosta seeds are small, flat, and black. They look like tiny bits of paper. You find them inside dry pods in late summer or fall. Keep in mind that some hosta varieties are sterile. They never make good seed.
The Big Surprise: Hosta Seeds Do Not Grow “True”
This is the part most articles skip, so read it twice. Gardeners say a plant grows “true” when its seedlings look just like the parent. Hostas almost never do this.
The American Hosta Society says that only one hosta, called Hosta ventricosa, makes seed that matches the parent. Every other kind makes seedlings that vary.
The reason is simple. The seed comes from two parent plants mixed together. It is like how brothers and sisters can look quite different. Also, many striped and golden hostas began as small changes in plain green plants. Those changes often do not pass on through seed. So when you plant hosta seeds from a fancy hosta, many seedlings come up plain green.
Good news: Because every seedling is unique, you might grow something nobody has seen before. That is how many new hosta varieties are born.
Hosta Seeds vs. Buying Plants vs. Dividing Clumps
Not sure which way to go? Compare the three options below.
- Hosta seeds: Very low cost and you can grow many plants. They are slow, and the results are a surprise.
- Buying plants: You get the exact variety you picked, and it looks good right away. But it costs more, especially if you need a lot of plants.
- Dividing a clump: This is free and gives you an exact copy. NC State Extension suggests dividing hostas every three to five years in early spring, just as the leaves come up.
Many smart gardeners do all three. They buy a few favorites, divide them over time, and grow hosta seeds to fill in the rest.
When to Plant Hosta Seeds
Fresh seed sprouts best. If you collect your own, you can sow it in pots in late summer or fall. If you buy seed, start it indoors in late winter or early spring. That gives your seedlings a full growing season before their first winter.
How to Plant Hosta Seeds Step by Step
You do not need fancy tools. A tray, some mix, and a bright spot will do.
- Start with fresh hosta seeds. Buy from a trusted seller and check the date on the pack. Older seed sprouts less often.
- Pick a clean tray or pot. It must have drain holes. Wash it well so it does not carry germs that harm seedlings.
- Fill it with seed starting mix. Use a light, fresh mix, not heavy garden soil. Wet the mix before you sow so it is damp, not soggy.
- Sow the seeds. Place them about an inch apart. Cover them with a very thin layer of mix, about one eighth of an inch. If you cover them too much, many will not come up.
- Cover the tray. Use a clear lid or plastic wrap to hold in moisture. Set it in a bright spot, out of hot, direct sun.
- Keep it warm. A room around 70 to 75 degrees Fahrenheit works well for most growers.
- Watch for sprouts. Most seeds come up within a few weeks. Once you see green, take off the cover and give the tray plenty of light.
Do Hosta Seeds Need a Cold Period?
You will see this question a lot, and the answers differ. Some sources say hosta seeds need a cold, damp rest before they sprout. Many growers find that fresh seed sprouts fine without one.
A simple rule works for most people. Start with fresh seed and warm, damp conditions. If your seed is old, or nothing sprouts after about a month, try a cold period. Put the seeds in a damp paper towel inside a sealed bag. Keep the bag in the fridge for a few weeks. Then sow them. Always follow your seed pack first if it gives its own advice.
How Long Do Hosta Seeds Take to Grow?
Patience is the secret ingredient. The timeline below is a rough average.
- Weeks 1 to 4: Tiny green sprouts appear.
- First season: Seedlings form small clumps with a few leaves.
- Years 2 and 3: Plants grow bigger and leaves get fuller.
- Years 3 to 5: Plants near full size and show their real leaf color and shape.
Do not judge a seedling too early. Young plants often look plain, then improve as they age.
The Best Spot in Your Garden for Hostas
Hostas are easy once you give them the right home.
- Light: Morning sun and dappled shade work best, much like the light in a woodland garden. Blue leaf types often like more shade to keep their color. Gold types often like a bit more light.
- Soil: Choose soil that is rich, damp, and drains well. Slightly acidic soil is ideal. Mix in compost when you plant.
- Climate: Hostas grow well in USDA zones 3 to 9. They need a cold winter rest below 40 degrees Fahrenheit for a couple of months. That is why they struggle in places like Florida or southern Arizona.
- Friends: Ferns, astilbe, coral bells, and bleeding heart look great beside hostas, and many other garden plants for shade work just as well.
How to Care for Hosta Seedlings
Water: Keep the mix damp, but never soaking wet. Wet soil can cause seedlings to rot and fall over.
Light: Seedlings need bright light. A sunny window or a basic grow light for 12 to 14 hours a day helps them grow strong, not tall and weak.
Moving outside: When the weather is mild and plants have several leaves, move them outdoors a little at a time. Start with an hour or two in the shade. Add more time each day for about a week and a half. This step is called hardening off, and it stops shock.
Planting out: Plant them in your shady spot in spring. Add a layer of mulch to hold in water. Water well during the first summer. Short on shady ground? Hostas also grow well in pots, and a few good container garden ideas can help you choose the right size and style.
Slugs and deer: Slugs love young hosta leaves, and deer love them too. Check your plants at dusk and pick off slugs by hand. You can also use slug bait made with iron phosphate. Follow the label. Thick, tough leaves tend to get chewed less than thin ones.
Pet safety: Hostas are toxic to dogs and cats if eaten. Plant them where your pets cannot nibble on them.
Common Problems and Easy Fixes
- Nothing sprouts: The seed may be old, too cold, too dry, or covered too thickly. Try fresh seed and a warm spot, and sow shallow.
- Seedlings fall over: This is often a rot problem called damping off. Use clean trays, do not overwater, and let air move around the plants.
- Tall, weak stems: The plants need more light. Move them closer to a window or add a grow light.
- Holes in leaves: Slugs are the most likely cause. Check at night with a flashlight.
- Brown, crispy edges: This means too much sun or not enough water.
- Giving up too soon: Hostas grow slowly at first. Give them time.
How to Collect Hosta Seeds From Your Own Garden
Free seed is the best kind. You can gather it from your own plants.
- Let the flowers fade. Do not cut the stalks. The pods need to grow.
- Wait for the pods to dry. They turn brown and start to split, usually in late summer or fall.
- Cut the pods and dry them. Lay them on paper in a cool, dry place for about a week.
- Open the pods. Shake out the flat, black seeds.
- Plant or store. Sow them soon, or keep them in a labeled paper envelope in the fridge until spring. Since every parent plant gives different seedlings, garden plant markers in each tray help you remember which batch came from which plant.
Want more control? Try hand pollination. Use a small paintbrush to move pollen from one hosta flower to another kind. Tag the flower so you remember the parents. This is how breeders make new varieties.
Frequently Asked Questions
Are hosta seeds easy to grow?
They are fairly easy to sprout if the seed is fresh and you keep it warm and damp. The hard part is the wait. It takes years to get a full size plant.
How long do hosta seeds take to sprout?
Most sprout within a few weeks when kept warm and damp. Older seed may take longer or may not sprout at all.
Will hosta seeds grow true to the parent plant?
Almost never. Only Hosta ventricosa makes seed that matches its parent. Most other hostas make seedlings that vary, and many come up plain green.
Can I plant hosta seeds straight in the garden?
You can, but it is hit and miss. Birds, slugs, and dry spells can wipe out tiny sprouts. Starting seeds in pots or trays gives you much better results.
Are hostas perennials?
Yes. Hostas die back in fall and grow again each spring. A healthy plant can live for many years.
Do hostas like full shade?
Most do best in part shade, with some gentle morning sun. Heavy shade is fine, but plants may grow slower and bloom less.
Is it better to grow hostas from seed or buy plants?
It depends on your goal. Buy plants if you want an exact variety fast. Choose seed if you want many plants for little money and you enjoy the surprise.
Final Thoughts
Hosta seeds are not the fastest way to a pretty shade garden. But they are one of the cheapest, and they are full of surprises. You pick up a lot along the way, save money, and may even grow a plant no one else has.
Your next step is simple. Start one small tray this season. Use fresh seed, sow it shallow, keep it warm and damp, and be patient. In a few years, that tray could be a garden full of healthy green leaves.