Garden Circle: How to Plan, Build, and Plant One
Walk into almost any backyard that looks amazing. Your eye will not stop at square flower beds. It will not stop at straight rows of shrubs. It stops at the circle. A round garden bed just feels finished. It feels calm. It feels like someone planned it on purpose, even before a single flower blooms.
A garden circle is one of the easiest ways to upgrade a yard. You do not need a big budget. You do not need to hire a landscaper. It works in a tiny city yard. It works in a wide open backyard. It even works in a small spot near your front porch. But most articles online skip the parts that matter most. How big should it be? What mistakes ruin the shape after a year or two? How much does the whole project cost?
This article covers all of that. By the end, you will know how to plan, mark, build, and plant one. And it will still look great five years from now, not only on the day you finish it.
What Is a Garden Circle?
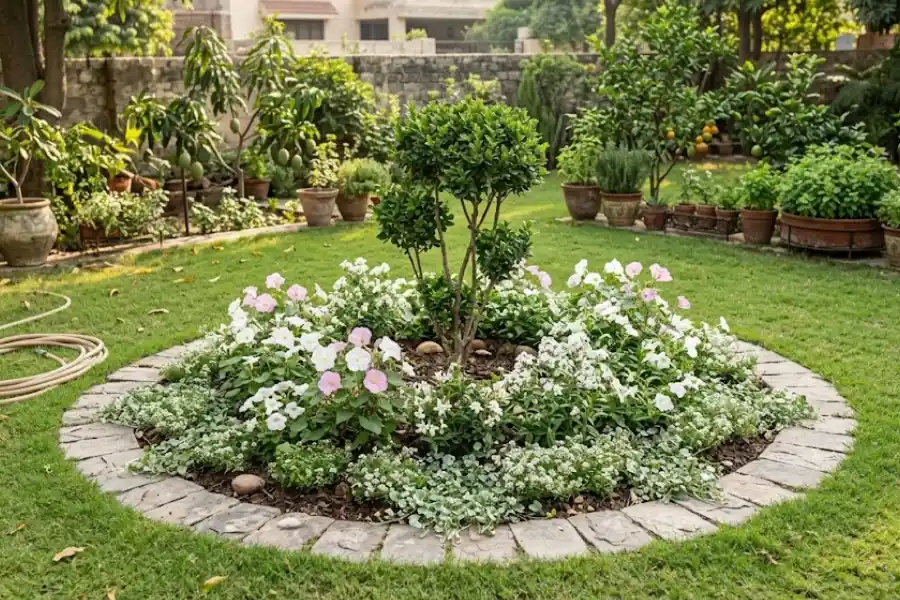
A garden circle is a round flower or vegetable bed. Gardeners often place it as a centerpiece. It might sit in a lawn, a courtyard, or an open patch of yard. Instead of straight edges and sharp corners, the whole bed is shaped like a wheel. Some people build one simple ring of plants around a center point. That center might be a small tree, a birdbath, or a sundial. Others slice the circle into parts, almost like a pie. Narrow paths run between each piece.
You might hear the phrase used a different way too. Some garden clubs use the term garden circle for a small group of members. These groups meet to talk about plants and local projects. That is a real thing. But it is not what most people mean when they search this phrase. This article is about the round garden design: the kind most readers want to build.
Why Circle Shapes Work So Well in a Garden
A circle has no corners, so your eye never gets stuck. It flows around the shape and lands on whatever sits in the middle. That is why this shape feels so calm, especially compared to a square bed jammed into a corner of the yard.
There is a practical reason too. A circle uses garden space better than long, straight rows. You can reach every plant from a shorter distance. That means less walking, less bending, and easier watering. Many gardeners who switch from rows to a circle say the upkeep gets easier within the first season.
Pick the Right Size Before You Dig
Size is the biggest decision in this whole project, and it’s also the one most beginners rush through. Here is a simple breakdown based on common yard sizes.
- Small circle, three to four feet across. Fits almost any yard, even a small front lawn or narrow side yard. You can reach the center from any edge without stepping on the soil. Great for a few potted herbs tucked near the edge, a single small tree, or a mix of low flowers.
- Medium circle, five to eight feet across. The most popular size, for good reason. It holds a real mix of plants and a center feature, yet stays easy to care for in under an hour a week. Most step-by-step tutorials online are built around this size.
- Large circle, ten feet or wider. Works best as a true focal point in a big backyard. At this size, you usually need a path through the middle, or a keyhole opening cut into one side, so you can reach every plant without walking on the bed. Skipping this step is one of the biggest regrets gardeners share after building a large circle.
How to Mark a Perfect Circle in Your Yard
You don’t need fancy tools for this part. Two simple methods work well.
The stake and string method:
- Push a wooden stake into the ground at the center point.
- Tie a string to the stake and measure out half of your desired width.
- Mark that spot on the string, then pull it tight.
- Walk slowly around the stake, marking the ground as you go with flour, sand, or spray paint.
This gives you a near-perfect circle every time.
The garden hose method: lay a garden hose on the ground and shape it into a circle by eye. It’s slower and less exact than the stake method, but it lets you adjust the shape as you go, which helps if your yard has an odd angle, a tree root, or a slope.
Once your outline is marked, remove the grass inside the line with a flat spade or a sod cutter, then loosen the soil underneath before you plant anything.
Choosing a Border That Won’t Fall Apart
A border does two jobs: it keeps grass and weeds out of your bed, and it gives the circle a clean, sharp edge that reads clearly from across the yard.
- Brick or stone pavers give a classic look that lasts and holds up well through cold winters, but they cost more and take longer to install.
- Steel or aluminum edging almost disappears once it’s in the ground, bends easily into a smooth circle, and lasts for decades, though it can cost more per foot than plastic.
- Wood edging is cheap and easy to work with, but it will rot over time. Most wood edging lasts five to ten years, depending on the wood and your climate.
- A low hedge or dense border plant (think boxwood or dwarf liriope) gives you a soft, living edge with no hard materials at all. It just needs regular trimming to stay neat.
What to Plant Inside Your Garden Circle
The classic layout uses three layers: a tall centerpiece in the middle, medium-height plants forming a ring around it, and low, spreading plants lining the outer edge. This keeps every plant visible from outside the circle, since nothing gets hidden behind something taller.
For the center, try a small ornamental tree, a large grass variety, a birdbath, or a sundial. If you’re growing food, try a bean or tomato teepee instead. For the middle ring, mix in flowering plants with different bloom times so something is always in color. For the outer edge, use low growers like alyssum, thyme, or trailing lobelia to soften the border and spill slightly over the edge.
Match your plants by light and water needs first, not just by color. A circle with both drought-loving succulents and thirsty annuals will always look uneven, because one group ends up overwatered while the other ends up underwatered. It’s nearly impossible to balance the two.
Want a food-producing version? Divide the circle into four sections with narrow paths between them, close to an old-fashioned kitchen garden layout. You still get the look of a round bed, but you also get real vegetables and herbs from it.
Common Garden Circle Mistakes
- Building it too large to reach the center. If you can’t reach the middle from the edge without stepping on soil, shrink the design or add a path through it.
- Ignoring drainage in the middle. Soil in the center of a mounded bed dries out faster than soil near the edges, since water tends to run outward. A drip irrigation ring solves this far better than hand watering from one side.
- Skipping the border completely. Without a clear edge, grass creeps in within a single growing season, and the clean circle shape disappears faster than most people expect.
- Not testing the sunlight first. Watch your chosen spot for a full day before you dig. A spot that looks sunny in the morning can end up shaded by afternoon once nearby trees or your house block the light.
Building on a Slope or Uneven Yard
You don’t need flat ground for this, but a slope changes how you build it. On a gentle slope, you can still mark a normal circle, just build the border a bit taller on the downhill side to hold soil in place during heavy rain.
On a steeper slope, try a small terraced circle instead, using a low wall on the downhill half only. This holds the soil level while keeping the round shape intact from above, which is the angle most people will actually see it from.
What a Garden Circle Costs
Costs change a lot based on size and materials. Here’s a realistic range for a medium, six-foot circle:
- Fully DIY: a wood or plastic edging kit, basic soil, and budget plants. Expect $80 to $200.
- Mid-range: steel edging, quality garden soil, and a mix of perennial plants. Expect $200 to $500.
- Higher-end: stone or brick pavers, a center feature like a birdbath, and mature plants. This can run from $600 well past $1,000, depending on materials.
Caring for Your Garden Circle Season After Season
- Spring: refresh the mulch layer, divide any plants that have outgrown their space, and fill gaps with new plants before summer heat hits.
- Summer: water the center of the bed a bit more than the edges, since it tends to dry out faster, and remove spent flowers often to keep the display full.
- Fall: cut back dead growth, plant spring-blooming bulbs around the outer ring, and add a fresh layer of mulch before the first frost.
- Winter: check your border for shifting or cracks, which often happens after freeze-and-thaw cycles, and make repairs before spring planting starts again.
Quick Checklist Before You Start Digging
- Confirm the spot gets the right amount of sun for the plants you want.
- Check your local rules before building anything permanent, like a stone border. Some neighborhoods have limits on yard features.
- Call your local utility locating service before digging deeper than a few inches. In the United States, dial 811. This free service marks buried gas, electric, and water lines so you avoid hitting something dangerous or costly to fix.
- Measure the full width of your plan, including the border material, not only the planting area, so you know precisely how much lawn space it will take.
Frequently Asked Questions
How big should a garden circle be?
Most beginners do best with a five to eight foot circle. It holds a real plant mix and a center feature while staying easy to reach and maintain.
What is the cheapest way to edge a garden circle?
Plastic or basic steel edging is usually the most affordable choice that still holds a clean curve. A low border plant costs even less if you’re willing to wait a season or two for it to fill in.
Can I build a garden circle in a small yard?
Yes. A three to four foot circle works well in tight spaces and still creates a strong focal point without taking over the whole yard.
Do I need a center feature in a garden circle?
No, but it helps a lot. A birdbath, small tree, or tall plant gives the eye a place to land and makes the whole design feel planned instead of random.
How long does it take to build a garden circle?
A small or medium circle usually takes one weekend, covering marking, digging, edging, and planting. Larger circles with permanent borders, like brick or stone, can take a few weekends.
Final Thoughts
A garden circle rewards a little planning more than most garden projects. Get the size right. Mark it carefully. Choose a border that fits your budget and your climate. Match your plants by their real needs, not only their color. Do all that, and it will still look great five years from now, not only on the day you plant it.